Thursday, September 12, 2013

Easy and Yummy Pumpkin Pie!

This was my first time baking a pumpkin pie and I was nervous, but after all the hard work, it turned out great. Everyone loved it!


Ingredients:
1 30 oz.can of Pumkin Puree
2 tsp. Ground Ginger
2 tsp. Ground cinnamon
1 tsp. Vanilla extract
2.5 c. Sugar
1 5 oz. can of Nestle Carnation Evaporated Milk
2 Large Eggs
1 Unbaked pre-made 9 inch pie shell
1 ungreased pie plate

Directions:
Preheat oven to 425 F for 15 minutes. Then reduce temperature to 350 F.
Lay the pie shell in your ungreased pie plate. Be sure to push it down so it forms around the plate.
Mix together well pumpkin pie puree evaporated milk and eggs.
Pour into pie shell, I braided the crust and cut out three hearts from the leftover pie shell I had. 


Bake for 50-60 minutes or until your knife comes out clean after checking center of pie.

Once the pie is done baking cool for 2 hours preferably on a wire rack.
Serve right away or refrigerate. You can top with whipped cream if desired. Enjoy!! :)

Candied Pumpkin (Calabaza en Piloncillo) *Don't throw away your fall pumpkins!*


In Mexico, candied pumpkins are often used in perfect time to enjoy the fall harvest.
There are many regional Mexican recipes for pumpkin, but this is the one that my mom always made for us growing up. Wonderful memories of autumn were made with this dish! It is sweetened with Piloncillo.


Piloncillo
This unrefined brown sugar is known worldwide as panela, but its Mexican version, piloncillo (pee-lon-SEE-yoh), is very tasty. Piloncillo gets its name from its cone shape and comes in light or dark brown. The taste of piloncillo is richer, and its consistency is harder, than the brown sugar. Piloncillo is made from pure sugar cane juice from cane that has been hand cut, crushed mechanically and then heated to reduce its water content. The resulting thick syrup is poured into cone-shaped molds to dry. Purists appreciate its unadulterated aspects: it's molasses-free, chemical-free.

Piloncillo can be purchased online at Mexgrocer.com

Ingredients:
1 medium pumpkin, about 5 pounds
8 cups water
1 1/2 pounds piloncillo broken into small pieces, just under 4 cups *(see Tips below)

Instructions:
Rinse pumpkin with water and dry well. Cut stem off of the pumpkin.
Pierce the shell-like outer rind of the pumpkin in several places to enable the syrup to penetrate the flesh and cut into pieces about 3 inches square, leaving the fibrous flesh and seeds inside.
In a wide, heavy saucepan put enough water to completely cover the pumpkin. Add the brown sugar and water and bring it to a boil. Add the pieces of pumpkin and cook over fairly high heat, moving the pieces around from time to time to avoid sticking. Cover the pan and cook for about 15 minutes, then remove the lid and continue cooking until the syrup has reduced and the flesh of the pumpkin is a rich brown. Serve warm with syrup and a glass or in a bowl with milk.

Tips:
1. If you don't have piloncillo, substitute 1 3/4 cups dark brown sugar and 1/4 cup molasses.
2. You may leave the skin on the pumpkin.

Makes about 30 pieces.

Saturday, August 17, 2013

Great looking affordable and durable flooring!


Our first home is great, but carpet in the kitchen is a HUGE NO NO!

Blue carpet in the kitchen!  

Parkay Floors in the dinning room

My husband and I were looking for dark wood flooring that was affordable. Now let's face it, dark wood is never cheap. We are always on a tight budget so we looked into Lumber Liquidators.

The flooring we were looking for had to look good, be durable and be affordable. We looked at all the hardwood and it was too much, so we looked at the laminate... it was affordable but didn't look like it would last and I needed it to last with all the traffic that a kitchen has and spills. Laminate is not appropriate for spills!

I then saw a gorgeous wood color that caught my eye right away! It was love at first sight!  :) 

http://m.lumberliquidators.com/ll/c/Summer-Island-Teak-Click-Resilient-Vinyl-Tranquility-5ST/10024913

When I asked what it was they said it was a type of vinyl.... I thought "No way!" But once he told us about it, I knew it was the right choice.


When I think vinyl, I think plastic glued on to my floor coming off a few years later.
This floor is not glued it is installed just like laminate, it clicks together and best of all, it's WATERPROOF!! Perfect for a kitchen!

We bought it and my husband installed it himself with the help of a friend in about 4 hours!! 
My husband taking off the parkway flooring from the dinning room


The floor is scratch resistant, waterproof and it comes with a 50 yr. Warranty. We have had it for about a month and its holding up great, its easy to clean and so pretty!


We spend a total of about $800 for 15 boxes of flooring and 2 rolls of the padding! Great Deal!

  Here are a few pictures.
No more ugly blue carpet!  :)

Nice even look for both rooms

New kitchen floor
Doesn't it look so much better?

DIY Kitchen Cabinet Refinish!

So we bought our first home a little over a month ago and we are already doing so many changes. It was a nice house to begin with but let's just say it needs a lot of updating. Here is how we made our cabinets go from this...
to this...
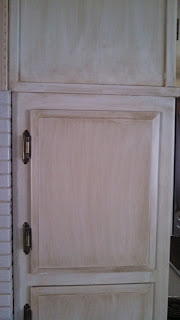
doesn't the kitchen look so much more roomy and the color just brightens up the whole room!  Now we are not experts and we had our doubts along the way but I really like the way it turned out. So let me start from the beginning.

My sister knew we wanted to do the project so she was kind enough to take me to Home Depot and pick up the Rustoleum Cabinet Transformation Kit.
    
http://cabinets.rustoleumtransformations.com

You can get an idea of it on their website. They come in many colors but I wanted a bright color so I went with the Ultra White.

The Kit comes with a DVD to explain all the steps and its pretty simple.

We started off by taking off all the doors and numbering them to keep track of where they went.

We then deglossed all the doors and the cabinets... this was the most time consuming,but at last we moved on.
We had to wait for it to dry completely and then we began to paint. It took 3 coats for mine to look decent. We waited about 3-4 hours in between each coat.

Once the last coat was dry we added the glaze. This is an optional step but in my opinion it was what gave the cabinets some character. Be careful and be consistent in the finish you want. To move faster, my husband would spread the glaze and my sister and I would wipe. Make sure you are always checking to make sure you have an even finish with all the parts. For example that some parts aren't darker than others.
Wait a few more hours for the glaze to dry and add the last few coats of clear gloss. 

The DVD has additional information on different techniques or what to do if you are changing hardware, but we liked our vintage hardware so we just cleaned them and used those.

The whole process took about 2-3 days but it saved us a ton and it was well worth it! I love showing off our 'new' cabinets and people love that day look vintage...just what we were going for.  I'm sure they can look modern too once you change the hardware and decor. But I love the look that it has now.  

In total my sister spend about $110 including the Rustoleum Cabinet transformation kit, a roll of plastic tarp, a roll of painter's tape and 4 paint brushes!

Now that's a deal!!

Try it out, I would love to see your pics!  

Here are a few more pictures! Enjoy!

Here you can see the pretty vintage hardware that we decided to keep.

Here you can see the wood grain coming through the bottom

This is the little corner nook that took me forever to degloss  :)

I loved these and decided to keep them for the same reason that I wanted the vintage look


Cute right?

Monday, June 10, 2013

Poblano Pepper Spaghetti


This is a spaghetti dish that my mom made growing up and I absolutely love and now make for my husband he loves it too. It is great as a side dish but it can very well be the main course as well. I hope you enjoy it.


Ingredients
1 lb. Spaghetti
2 poblano peppers
2 Garlic Cloves
Salt to taste
1 1/2 tsp. ground black pepper
1 1/2 cup Mexican style sour cream
1/4 cup milk
1/4 cup water


Preparation
1. Cook the spaghetti noodles following the instructions of the box.

2. One or two at a time, cook peppers directly on the grate for about seven minutes. Periodically turn with tongs or a fork to cook all sides of the skin. (don't worry if it looks black, that will go away when you peel it)


If you don't have a gas stove roast peppers in the oven, preheat the oven to 450° F. Spread the peppers in a single layer on a foil-lined baking sheet and cook until the skin blisters and begins to darken, about five to ten minutes.

3. Put the peppers inside a plastic bag so they can "sweat" and then you can remove the skin easier (for about 8 mins.)

4. While the peppers are "sweating" peel the garlic cloves, and ... check your pasta!

5. Once the peppers are ready peel them and get the seeds and veins out (use plastic gloves and be careful they might still be hot)


6. Now just blend the roasted flesh of the peppers, the garlic,black pepper, sour cream and water until it is a creamy green sauce.

7. Pour the sauce in a pot on the stove (low heat) until it starts to boil.

8. Add the cooked spaghetti to the simmering sauce and let it all simmer for about 5 minutes making sure all the noodles are covered by the sauce, you can use the 1/2 cup of milk (or less or more) to get the desired consistency of the sauce. It should have a creamy consistency. Add salt to taste and serve.

Friday, May 24, 2013

Paleo Pumpkin Cranberry Bread


This is a recipe I had seen a while back and decided to give it a try. With the help of my daughter we made it. Most people like pumpkin during the fall but I had all the ingredients at hand and decided to do it plus I simply love pumpkin all year long.
Here is the recipe:
PREP TIME: 15 minutes
COOKING TIME: 1 hr.
YIELD: 1 medium loaf


Ingredients:
5 eggs, beaten
1/4 cup pumpkin puree (can be canned or fresh, if fresh, cook, cook and strain excess water from your pumpkin before using it in this recipe)
1/2 cup coconut oil,melted(I used Trader Joe's Organic Virgin Coconut Oil)
1 teaspoon vanilla
1/4 cup honey or maple syrup
1/2 cup coconut flour
1/2 tsp sea salt
1/4 teaspoon baking soda
1/2 teaspoon ground cinnamon
1/2 teaspoon ground ginger
1/4 teaspoon ground allspice
1/2 cup cranberries


Preparation:
Preheat oven to 350F.
Whisk the eggs, pumpkin, coconut oil, pure vanilla extract, and maple syrup together in a large mixing bowl. Sift in the coconut flour, sea salt, baking soda, and spices and stir until well combined. Gently fold in the cranberries.


Pour into a loaf tin (natural parchment works best for lining), and bake for 1 hour or until a an inserted toothpick comes out clean. 


Enjoy!

Sunday, May 5, 2013

15 Breastfeeding Tips!


I Breastfed my daughter for about 14 months and even though it was very difficult at first, I'm glad I had the dedication to keep going.

Here are some tips that helped me.


1. Find support! Whether if it's a friend, a family member, an online group or a hotline; find it and use it.

2. Read, Read, Read! I am still learning new things after my first. Many of your questions will be answered by reading into it. I used Baby 411 http://www.amazon.com/gp/aw/d/B005JU9NC2 I thought it was very clear on my questions and honestly very easy to follow.

3. Buy a pump: make sure it is a strong one. I had an electrical one, but it was kind of weak. So do yourself a favor and invest in a good one. The stronger it is the faster and it will extract the milk. If it's weak, it will take longer and your breasts will become sore.

4. Buy lanolin cream! It will be your best friend. Apply even if you think you don't need it. Prevention is great and when it comes to bloody cracked nipples, trust me you want to protect them. If you use it from the beginning your baby won't be able to tell the difference. If you use it later on, just use it regularly and they will get used to it. * extra: lanolin is the best for diaper rash it works miracles! Much better than other ointments*

5: Make sure you are comfortable. I used my glider every single day. I always put a pillow to support the arch in my back and I was ready to feed. It gave me perfect support. I placed my arm on the arm rests and it helped with the weight of the baby. Because like every mom knows, babies are tiny but hold them enough and you'll notice your arms get very sore.

6. Massage your breasts. I would constantly get lumps in my breasts. Trust me you don't want to feel it. When feeding make sure you massage to ensure all the milk is being extracted evenly.

7. Change positions. From the beginning. Make sure your baby gets used to feeding no matter the position. This will help later on when you are out in public, and help with even extraction. 

8. Drink lots of water. You will feel extremely thristy. Listen to your body. The more water you drink the more milk you will have.

9. Eat healthy. You will also feel extremely hungry. Breastfeeding burns 20 calories per once of milk. On an average day you burn 400-600 calories, for exclusive breastfeeding. So yeah.. you will be hungry.

10. Take your time. If you have a small supply. Don't hurry. Let the baby feed until he or she is full. This might take longer than for moms with a larger supply, but it will be worth it. Stick with it and don't supplement unless you see that your baby is being affected health wise. Many moms think they don't have enough, but do. Be patient.

11. Relax. Take a bath or a long warm shower. Massage your breasts the heat will help with any pain you might have.

12. If you feel like your supply is low, you can do a lot to help increase it. Try these things before you give up. Be patient, relax, research foods that increase your milk supply and try them. Try a few weeks things take time to take affect. Here is a recipe for cookies that might help.
Oatmeal Chocolate Chip Lactation Cookies By Noel Trujillo Recipe - Food.com - 192346.
Here is a list of foods that help increase your milk supply.
http://www.breastfeeding-problems.com/increase-milk-supply.html 


13. Don't over work out. Many moms are in such a hurry to get back in shape that they don't consider that the body needs rest. If you are breastfeeding and working out too much you will eventually burn out and dry out. Your body needs rest to produce milk, so instead of hitting the gym, go out for a walk with your baby. You are working out and you will still be rested enough to produce milk.

14. If you are feeling exhausted. Lay down. You will still be able to breastfeed and rest at the same time. Your baby won't mind at all. 

15. Take pride in your dedication. The thing that got me through the horrible pain and work was that I was doing something great. I was not going to give up and I was going to show everyone I could. And I did.


Breastfeeding is a wonderful difficult process. But you can do it! If the first time you can't , try again. Educate yourself more and more, it makes a great difference. You can always go to your doctor or lactation consultant if all else fails. http://www.llli.org


Happy Breastfeeding!

Saturday, May 4, 2013

Homemade Owl Piñata


My daughter's 1st birthday theme was "Look Whoo's 1!" It was a girly owl theme, but I couldn't find an owl Piñata that was what I wanted and affordable. So I decided to make it. Here is what I did. *Start a week in advance to your event, to insure it dries completely. *
Materials:
Balloon, newspaper,glue, water, black crêpe paper, construction paper, glitter and a needle. 
Instructions:
Cut newspaper into about 2 in. Strips. Make plenty.
Blow up the balloon to the desired size of the owl.
In a large bowl mix blue and water, make it runny but still sticky.
Dip a strip of newspaper one by one and run your fingers through it to take off the excess glue mix. Then place it on the balloon. Cover the entire surface with two layers.
Tie a string to the tied off end of the balloon and hang in a well ventilated area. Best if you hang outside.
Next day repeat the covering strips again. Place two more layers. Depending on how thick you want it you can repeat again and again.
When it is totally dry, really check! Make a small hole in the balloon and let the air out slowly, it the form starts to collapse, it is not dry enough. Form it back and slowly continue. Let it dry.
Start covering the entire surface with the crepe paper. Then cut construction paper in the shape of wings, eyes, beak, bow, feet, and ears. Make a lot of little circles for feathers, decorate the 'feathers' with the glitter, Place them in the middle of the body and glue the rest of the parts on.
On the back, carefully cut a slot for the candy and treats. And a two way opening for the rope to hang from.
Hang to dry then fill with candy.
Enjoy!

Wednesday, May 1, 2013

Overcoming Miscarriage


As I wrote the title, a thought came to mind. "Can it be overcome?" It will always hurt and it will always be there in some way, but it does get easier. I would like to share my personal story, so you see it can be done. Even though it may not feel that way for a while.
My story begins when I found out I was pregnant. I was 18 and it was not planned but I loved my child from the moment I knew it was growing inside me.
My boyfriend and I were scared but happy and planned for the future.
My pregnancy was actually easy. Which now I think might have been a red flag. I had no nausea, no problems. The doctors were a little concerned that I was loosing weight instead of gaining it. At 12 weeks, they tried to hear the heartbeat. There wasn't one. Then the doctors said. "It's OK, come back next week and we will check again" but that weekend I was in the ER with the most horrible pain. I was in the waiting room for 3 hours.I  was then taken up to the exam room. There they had me sign all the paperwork, which included a sheet that asked what I would like to do with the remains. It had two choices: toss or turn them into me. Of course I wanted them. 
Later that day told me that there was something wrong with my insurance that I have to leave right away. listen no state to be out of the hospital, but  they refused to help. 

The next day I went to a different hospital which someone referred me to. When I arrived the nurses tended to me right away , I told them about my insurance issue and they said it didn't matter. I needed medical care and they were going to take care of me. After hours of waiting for the miscarriage to 'pass' I had a D&C done. There I was informed that the remains were no longer there. I must have passed them at the other hospital. I was devastated I didn't know where my baby was. 

I needed to know what happened so I went to the first hospital and explained my situation. It was then when my heart broke for the second time. They had the remains, but not anymore. They send them to the lab and "tossed them".....

During this whole time, I was mad! At God. For doing this to me. What did I do to deserve this? I wanted answers and most of all I needed closure. I asked a local priest if he could tell me where my baby was. I really needed to hear he/she was OK. Instead I heard " well I'm sorry but you didn't baptize the child so he is not in Heaven. He is not with God. My response to this was "well then where? " The priest then said " unfortunately he will be in limbo" 

How could my only hope be shattered? 

I went a couple of years crying and praying for this not to be true. My boyfriend, now fiance at the time, wanted to try again but I couldn't get over the fear. Coincidentally we found a new church and they answered all my questions. And backed it up with scripture. How could a loving God not accept an innocent child into His Glory, when Jesus himself says that Heaven is made for children ? That just made sense. That is the God I wanted to love and Worship.

 It took about 3 years for me to try again and it was successful. Too many tears were spilled because of misinformation and obstacles. But in the end I know my baby is in Heaven with my Lord and I could ask for a safer place. 

Whether this is resent to you or years have passed, I don't think it's right for you to not know the truth. And know that the heart does heal. You will get through this. Talk about it, pray about it. Ask questions. But trust that God is in all things and He is with you every step of the way.  

How to handle Stress

These are just a few things I try to do when I'm stressed. It's a working progress but it is helpful.
-try to avoid stress at all costs. Like people say "stay away from the drama"
- Acknowledge that you are in a situation and walk away. It's hard but its worth it.
-  Turn on some music, life is better with music.
- Go out for a walk. Fresh air is always good. Even if its cold, just bundle up and walk it out. I always find myself walking and just thinking and praying along the way.
-Get in the shower or bath. Being a mom you can't always run the water and add the bubbles but you can get in the shower. Stand in there and relax, its nice to pamper yourself anyways so just go with it.
-Pray. When the stress is caused by something personal and you can't talk to anyone about it, pray. God is always listening and never judging. Just what we need.

May Day

So today is May day and it's a gorgeous day outside so what am I doing? I am home because its too hot! Lol ...as soon as Elisa decides to finish eating or start for that matter, we will head out for a walk. We'll see how it goes.