Tuesday, May 20, 2014

Super Fun and Colorful Wreath

 If you were anywhere near the Chicago area this past winter, you know how long it was. Very long! And when we got the first hint of spring weather (40°F) lol I decided to send winter a clear message to GO AWAY!  So I made a colorful Spring wreath and hung it on my front door! It looked a little crazy because it snowed a couple of times after that, but I was determined :)

Materials:

$5 Natural grapevine wreath-Hobby Lobby

$4 Colorful silk flowers -Dollartree

$1 Wooden letter -Walmart

$0 Hot glue

$0 Hot glue gun

$.50 Bottle of Green Acrylic paint

$0 Pink ribbon


I just hot glued the flowers onto the wreath leaving an empty spot for the letter.

Then with the help of my 3 year old, she painted the 'M' for our last name.

Once it dried, I hot glued it to the wreath.
Tied a ribbon, which I had laying around, at the top and hung it on the door.


It wasn't expensive at all, and I think it's gorgeous!

Spring Branch Decoration


I saw a similar design online and thought it would be gorgeous on my mantle. So I decided to make my own.
Materials:
Dry tree branches
Bag of jellybeans
Hot glue
Hot glue gun
Vase to put them in


I began by deciding the height of the arrangement and cutting the branches to that size.
Then, one branch at a time, I glued one jellybean at a time to random places on the branch.
Repeated until I got the look I liked.
Placed them in a glass vase and set them on my mantle.
DONE! Super Easy and I got so many compliments on them.
Here is how they came out.
Note: My camera doesn't really catch the full colors indoors.

Thursday, September 12, 2013

Easy and Yummy Pumpkin Pie!

This was my first time baking a pumpkin pie and I was nervous, but after all the hard work, it turned out great. Everyone loved it!


Ingredients:
1 30 oz.can of Pumkin Puree
2 tsp. Ground Ginger
2 tsp. Ground cinnamon
1 tsp. Vanilla extract
2.5 c. Sugar
1 5 oz. can of Nestle Carnation Evaporated Milk
2 Large Eggs
1 Unbaked pre-made 9 inch pie shell
1 ungreased pie plate

Directions:
Preheat oven to 425 F for 15 minutes. Then reduce temperature to 350 F.
Lay the pie shell in your ungreased pie plate. Be sure to push it down so it forms around the plate.
Mix together well pumpkin pie puree evaporated milk and eggs.
Pour into pie shell, I braided the crust and cut out three hearts from the leftover pie shell I had. 


Bake for 50-60 minutes or until your knife comes out clean after checking center of pie.

Once the pie is done baking cool for 2 hours preferably on a wire rack.
Serve right away or refrigerate. You can top with whipped cream if desired. Enjoy!! :)

Candied Pumpkin (Calabaza en Piloncillo) *Don't throw away your fall pumpkins!*


In Mexico, candied pumpkins are often used in perfect time to enjoy the fall harvest.
There are many regional Mexican recipes for pumpkin, but this is the one that my mom always made for us growing up. Wonderful memories of autumn were made with this dish! It is sweetened with Piloncillo.


Piloncillo
This unrefined brown sugar is known worldwide as panela, but its Mexican version, piloncillo (pee-lon-SEE-yoh), is very tasty. Piloncillo gets its name from its cone shape and comes in light or dark brown. The taste of piloncillo is richer, and its consistency is harder, than the brown sugar. Piloncillo is made from pure sugar cane juice from cane that has been hand cut, crushed mechanically and then heated to reduce its water content. The resulting thick syrup is poured into cone-shaped molds to dry. Purists appreciate its unadulterated aspects: it's molasses-free, chemical-free.

Piloncillo can be purchased online at Mexgrocer.com

Ingredients:
1 medium pumpkin, about 5 pounds
8 cups water
1 1/2 pounds piloncillo broken into small pieces, just under 4 cups *(see Tips below)

Instructions:
Rinse pumpkin with water and dry well. Cut stem off of the pumpkin.
Pierce the shell-like outer rind of the pumpkin in several places to enable the syrup to penetrate the flesh and cut into pieces about 3 inches square, leaving the fibrous flesh and seeds inside.
In a wide, heavy saucepan put enough water to completely cover the pumpkin. Add the brown sugar and water and bring it to a boil. Add the pieces of pumpkin and cook over fairly high heat, moving the pieces around from time to time to avoid sticking. Cover the pan and cook for about 15 minutes, then remove the lid and continue cooking until the syrup has reduced and the flesh of the pumpkin is a rich brown. Serve warm with syrup and a glass or in a bowl with milk.

Tips:
1. If you don't have piloncillo, substitute 1 3/4 cups dark brown sugar and 1/4 cup molasses.
2. You may leave the skin on the pumpkin.

Makes about 30 pieces.

Saturday, August 17, 2013

Great looking affordable and durable flooring!


Our first home is great, but carpet in the kitchen is a HUGE NO NO!

Blue carpet in the kitchen!  

Parkay Floors in the dinning room

My husband and I were looking for dark wood flooring that was affordable. Now let's face it, dark wood is never cheap. We are always on a tight budget so we looked into Lumber Liquidators.

The flooring we were looking for had to look good, be durable and be affordable. We looked at all the hardwood and it was too much, so we looked at the laminate... it was affordable but didn't look like it would last and I needed it to last with all the traffic that a kitchen has and spills. Laminate is not appropriate for spills!

I then saw a gorgeous wood color that caught my eye right away! It was love at first sight!  :) 

http://m.lumberliquidators.com/ll/c/Summer-Island-Teak-Click-Resilient-Vinyl-Tranquility-5ST/10024913

When I asked what it was they said it was a type of vinyl.... I thought "No way!" But once he told us about it, I knew it was the right choice.


When I think vinyl, I think plastic glued on to my floor coming off a few years later.
This floor is not glued it is installed just like laminate, it clicks together and best of all, it's WATERPROOF!! Perfect for a kitchen!

We bought it and my husband installed it himself with the help of a friend in about 4 hours!! 
My husband taking off the parkway flooring from the dinning room


The floor is scratch resistant, waterproof and it comes with a 50 yr. Warranty. We have had it for about a month and its holding up great, its easy to clean and so pretty!


We spend a total of about $800 for 15 boxes of flooring and 2 rolls of the padding! Great Deal!

  Here are a few pictures.
No more ugly blue carpet!  :)

Nice even look for both rooms

New kitchen floor
Doesn't it look so much better?

DIY Kitchen Cabinet Refinish!

So we bought our first home a little over a month ago and we are already doing so many changes. It was a nice house to begin with but let's just say it needs a lot of updating. Here is how we made our cabinets go from this...
to this...
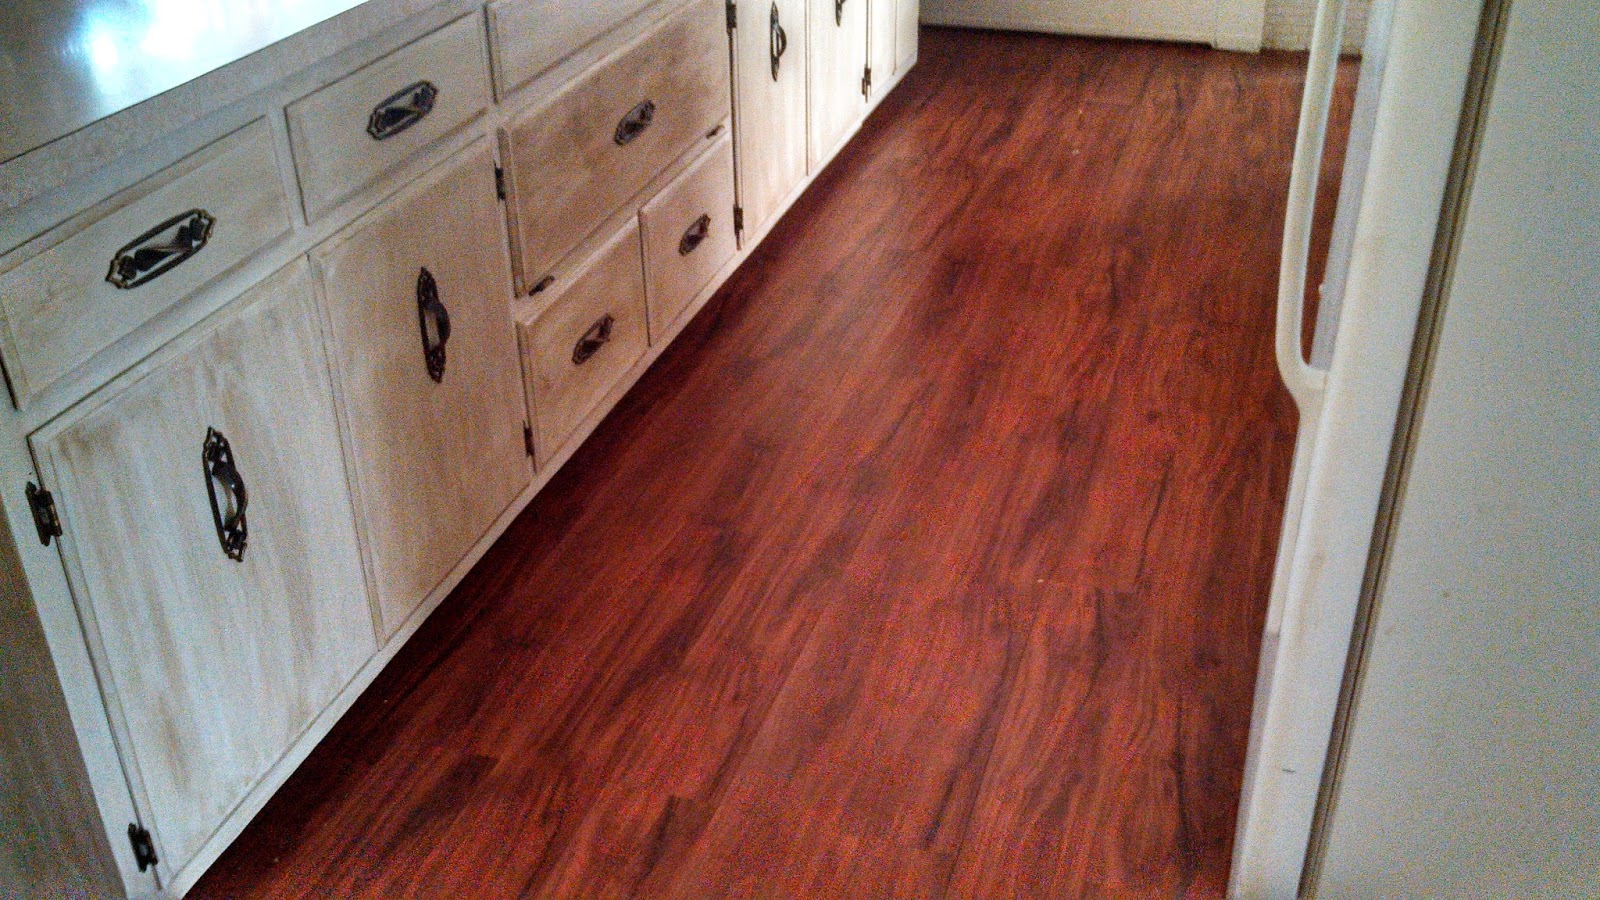
doesn't the kitchen look so much more roomy and the color just brightens up the whole room!  Now we are not experts and we had our doubts along the way but I really like the way it turned out. So let me start from the beginning.

My sister knew we wanted to do the project so she was kind enough to take me to Home Depot and pick up the Rustoleum Cabinet Transformation Kit.
    
http://cabinets.rustoleumtransformations.com

You can get an idea of it on their website. They come in many colors but I wanted a bright color so I went with the Ultra White.

The Kit comes with a DVD to explain all the steps and its pretty simple.

We started off by taking off all the doors and numbering them to keep track of where they went.

We then deglossed all the doors and the cabinets... this was the most time consuming,but at last we moved on.
We had to wait for it to dry completely and then we began to paint. It took 3 coats for mine to look decent. We waited about 3-4 hours in between each coat.

Once the last coat was dry we added the glaze. This is an optional step but in my opinion it was what gave the cabinets some character. Be careful and be consistent in the finish you want. To move faster, my husband would spread the glaze and my sister and I would wipe. Make sure you are always checking to make sure you have an even finish with all the parts. For example that some parts aren't darker than others.
Wait a few more hours for the glaze to dry and add the last few coats of clear gloss. 

The DVD has additional information on different techniques or what to do if you are changing hardware, but we liked our vintage hardware so we just cleaned them and used those.

The whole process took about 2-3 days but it saved us a ton and it was well worth it! I love showing off our 'new' cabinets and people love that day look vintage...just what we were going for.  I'm sure they can look modern too once you change the hardware and decor. But I love the look that it has now.  

In total my sister spend about $110 including the Rustoleum Cabinet transformation kit, a roll of plastic tarp, a roll of painter's tape and 4 paint brushes!

Now that's a deal!!

Try it out, I would love to see your pics!  

Here are a few more pictures! Enjoy!

Here you can see the pretty vintage hardware that we decided to keep.

Here you can see the wood grain coming through the bottom

This is the little corner nook that took me forever to degloss  :)

I loved these and decided to keep them for the same reason that I wanted the vintage look


Cute right?

Monday, June 10, 2013

Poblano Pepper Spaghetti


This is a spaghetti dish that my mom made growing up and I absolutely love and now make for my husband he loves it too. It is great as a side dish but it can very well be the main course as well. I hope you enjoy it.


Ingredients
1 lb. Spaghetti
2 poblano peppers
2 Garlic Cloves
Salt to taste
1 1/2 tsp. ground black pepper
1 1/2 cup Mexican style sour cream
1/4 cup milk
1/4 cup water


Preparation
1. Cook the spaghetti noodles following the instructions of the box.

2. One or two at a time, cook peppers directly on the grate for about seven minutes. Periodically turn with tongs or a fork to cook all sides of the skin. (don't worry if it looks black, that will go away when you peel it)


If you don't have a gas stove roast peppers in the oven, preheat the oven to 450° F. Spread the peppers in a single layer on a foil-lined baking sheet and cook until the skin blisters and begins to darken, about five to ten minutes.

3. Put the peppers inside a plastic bag so they can "sweat" and then you can remove the skin easier (for about 8 mins.)

4. While the peppers are "sweating" peel the garlic cloves, and ... check your pasta!

5. Once the peppers are ready peel them and get the seeds and veins out (use plastic gloves and be careful they might still be hot)


6. Now just blend the roasted flesh of the peppers, the garlic,black pepper, sour cream and water until it is a creamy green sauce.

7. Pour the sauce in a pot on the stove (low heat) until it starts to boil.

8. Add the cooked spaghetti to the simmering sauce and let it all simmer for about 5 minutes making sure all the noodles are covered by the sauce, you can use the 1/2 cup of milk (or less or more) to get the desired consistency of the sauce. It should have a creamy consistency. Add salt to taste and serve.